If you love butternut squash and have made it into soups, curries, ravioli, roasted it, mashed, it, stir fried it and even juiced it then you might be looking for a new way to incorporate this delicious winter vegetable. Then this is the recipe for you! These Butternut Squash Tamales are savory and delicious but they do require a bit of time to prepare. My suggestion would be to make the dough and the filling on one day, then stuff the tamales and cook them the next day. Of course, making them in one day is possible but it will take around 3 hours from start to finish. Tamales are a process well worth the time, not to mention they make the kitchen smell like limes and tortillas! I've included a recipe for homemade chipotle hot sauce since I was not able to find chile in adobo sauce that was not being sold in an aluminum can (boo hoo on BPA leaking and possible future aluminum induced Alzheimer's disease.) So, I made my own for the first time and couldn't believe how easy it was! Let's get started...
Here's what you're going to need:
For the dough
- 2 cups butternut squash, diced
- 3 1/4 cups vegetable broth
- 6 chives, chopped (white and green)
- 1 Tbsp. Chipotle en Adobo sauce
- 1 3/4 cup masa harina (Bob's Red Mill is a good non GMO brand)
- 2 Tbsp. evoo
- 2 cloves garlic, minced
- 1-2 tsp. sea salt
- 1 tsp. ground cumin
For the filling
- 1 small bunch chives, finely chopped (white and green)
- 4 cloves of garlic, minced
- 2 Tbsp. Chiptole in Adobo sauce (or more if you want to turn up the heat)
- 1 tsp. ground cumin
- 1 tsp. coriander
- 1-2 tsp. sea salt
- 1/2 cup golden raisins
- 1 cup vegetable broth
- 1 1/2 tsp. orange zest
- 2 Tbsp. evoo
Method for the Dough:
- Into a medium sized stock pot, add the butternut squash, spring onion, adobo sauce, garlic, salt, cumin, and the vegetable broth. Bring to simmer over medium-low heat, cover and cook about 15 minutes or until the squash is tender and mashable.
- Turn off the heat and grab a slotted spoon. Carefully remove the cooked squash and place in a bowl. We will be using the broth so cover it back up and set aside.
- Into a large mixing bowl, place half of your cooked butternut squash. Mash the squash with a fork and then mix in the masa harina (1 3/4 cups).
- Take the lid off of your stock pot and slowly pour the broth over the masa mixture. Mix with a fork until the mixture is smooth and creamy. Stir in the olive oil and then cover with plastic wrap and set aside. If it seems too dry, add a little bit more oil maybe 1 to 2 tbsp. extra.
Method for the Filling:
- In a large skillet, heat your 2 Tbsp. of olive oil over medium heat. Add the garlic, chives, cumin, coriander, and salt cooking until just tender or for about 1 minute. Add the reserved butternut squash, golden raisins, chipotle sauce, and stir together gently.
- Add the vegetable stock and orange zest to the pan stirring occasionally until the liquid has been moderately absorbed or for about 2 to 3 minutes. Remove from heat and place the filling into a bowl.
Method for Tamales:
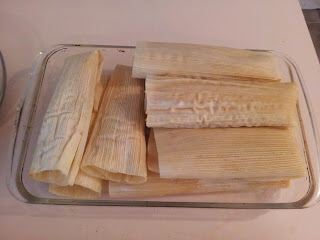
- Soak the corn husks in warm water for 20 to 30 minutes to soften. Remove from water and set on a plate for easy assembling (see assembly pictures below).
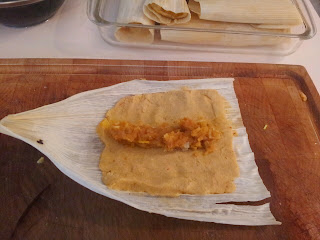
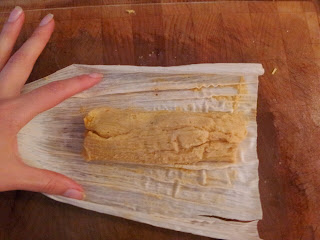
- With the dough and filling within reach, begin to assemble your tamales. Take one husk and lay it flat on the cutting board open side up, horizontal to you with the bottom of the husk to your left (if you are right handed). Take 2 to 3 Tbsp. of dough and press it onto the husk in a rectangular shape. Keep the dough even and press until it is about 1/4' thick.
- Spoon a little bit of the filling in a line onto the center of your dough.
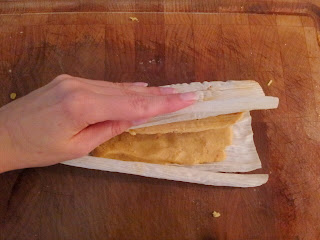
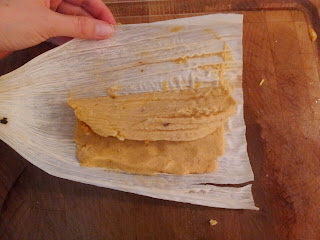
- Take the edge of your corn husk that is farthest from you and gently fold it toward you. This will bring the dough over the filling and is forming your tamale. Gently pull back the husk leaving your tamale on one half of the husk. Press in any edges that are protruding and make it look pretty if it's a bit sloppy. Then fold up your tamale by placing the husk back over and folding up the bottom. There will be an open end. You can leave this open and when the tamales are steamed, stand up the tamales open side up. Another option is to tie off the open end with a piece of husk and then steam the tamales on their sides.
- Steam your tamales for 30 to 50 minutes. If you plan to freeze any, steam them first, allow to cool completely then pack for the freezer to reheat anytime.

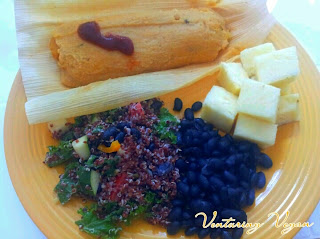
I served my tamales with a kale quinoa salad, pineapple and some homemade black beans for a complete meal. Of course, you could also served with Mexican rice and churros for a full dinner! I hope you enjoy making these tamales and remember to be patient with them, it is a process that gets easier and quicker with practice. Enjoy!