Wednesday, January 29, 2014

Flax Crackers, Vegetable Pate, and a Garden Wrap!

For my birthday last year, my amazing (and vegan, thanks to yours truly!) mother gifted me my very own and very first dehydrator!  Thanks to my raw food obsession, this bad boy has come in pretty handy.  I've made the incredible and addicting kale chip, I've made pizza, cookies, wraps, even sweet potato dog treats in my dehydrator.  Well, I was totally stoked when I made my first batch of flax crackers!  They were so incredibly delicious, easy to make, and perfect for snacking with dips that I fell in love with my first bite!  So now, in the spirit of passing it forward and universal love, I gift this recipe to you all.  If you don't have a dehydrator, I suggest baking them in the oven.  They won't be raw but they will be much better for you than traditional chips that are loaded with fat and sodium.  If you do have a dehydrator, than I can guarantee perfection with this recipe.  Enjoy! Oh, and don't forget that you can mix it up with this recipe.  Flax seeds don't have a lot of flavor on their own so go ahead and add your favorite herbs and spices to create new versions.  I've used a mix of garlic salt, cumin and dried cilantro with a pinch of lime juice to make a flax "tortilla" chip to go with guacamole!

Flax Crackers Ingredients:
  • 1 cup whole, raw flaxseeds
  • 1 cup water
  • 1 tsp. garlic salt (option to use sea salt instead)
  • 1 tsp. dried basil (or your favorite herb)
Method:
  1. Add flax seeds, salt, and basil to a medium-sized bowl and toss to mix.  Add the water and stir well.  Set aside for 5-10 minutes.  Flax seeds form a gel around the outside of the seed when they are wet.  This gel is what will hold the cracker together.
  2. Take a lined tray from your dehydrator and use a spoon to scoop the batter onto the tray in cracker sized circles.  Remember, what you see is what you get so make them the size that you want.  I've made little bite-sized crackers and larger crackers for spreading raw cheezes on, both are great!  Dehydrate for about 8 hours.
 
 
Vegetable Pate Ingredients:
  • 1 cup raw almonds
  • 1 Tbsp. grated ginger
  • 2 cloves garlic
  • 1 tsp. sea salt
  • 3 carrots, chopped
  • 2 stalks celery, chopped
  • 1/4 cup onion, chopped
  • 2 Tbsp. extra virgin olive oil
  • 1 Tbsp. fresh lemon juice
Vegetable Pate Method:
  1. Using a food processor fitted with "S-type" blade, process almond into a flour and set aside.
  2. Add garlic, ginger and sea salt and process a few beats.  Then add the carrots, celery, onion, olive oil, and lemon juice and pulse till you have the desired consistency. I pulse until it is hummus like for a dip but a pulse until everything is in little pieces if I am going to put it in a wrap. 

To make a wrap, take a large collard leaf and lay dark side down.  Shave the stem so that it is flush with the leaf.  This will allow the leaf to bend and wrap without breaking.  Add some pate, veggies, lettuce and herbs (or whatever you have on hand) then wrap it up like a burrito.

 
I had this for lunch yesterday and it was incredible!  If you've never had a collard wrap before (I promise to make a how-to on collard wrapping soon) then you are in for a treat!  Collard greens are full of vitamins and iron and they pack a powerful punch of energy!  I had mine before I went out for a hike in a park by my house called Fish Creek park.


That might look like a bird house but it's actually a little bat house! So cute!! The bats here are really tiny and 100% adorable.  I'll try to get a picture of one to show you guys!

Last night I had a really great time going out to Seattle to attend my friends book launch!  His name is Gyasi Ross and he wrote a really touching and insightful book called, How to Say I Love You in Indian.  I highly recommend reading his book because as a non-native it really opened my eyes to a new perspective about life, love and family.  Here are a few pics from last night:
Great Words
Great Art
and selfies on the ferry ride home from Seattle :)
 
Thank you so much for stopping by the Venturing Vegan blog today!!  Don't forget that viewer comment are like blog cash tips!  I love hearing from you guys!
 
xoxo,
VV

Raw Falafel with Cashew Tzatziki Sauce


Chickpeas come two ways, in a can or dried from the bulk section of your grocery store.  If you are an overachiever (you know who you are!) then maybe you have grown your own and harvested them fresh from your garden!  If you're like me, you hit up the bulk bins and load up on dried garbanzo beans to keep on hand in your pantry.  About a year ago, I had my first experience with how wonderful chickpeas are to sprout.  If you've never sprouted before, chickpeas (also called garbanzo beans) are a lovely introduction to the ease and enjoyment of home sprouting.  Since they are large and quick to sprout, this makes for easy rinsing and quick sprouted tails which are ready to go in 1-2 days.  They last about a week in the refrigerator and sprouted chickpeas can be used in all the same ways as cooked chickpeas: in hummus, stews, salads, and of course, as a raw falafel ball! 

Falafel is a Middle Eastern dish that is usually deep fried and made of chickpea flour.  I have a delicious Baked Falafel which is amazingly delightful with flat bread, Vegan Tzatziki Sauce, and Quinoa Tabouli.  If you're up for a collard wrap, then I highly recommend preserving the raw integrity of the meal and opting for the delicious, easy, and colorful Raw Falafel with Cashew Tzatziki Sauce and Tabouli.  Tzatziki is a cool and creamy garlic, cucumber yogurt sauce that is heavenly!  You can  make this with a soy/hemp/almond yogurt and have a more traditional tzatziki or you can keep it totally raw, preserve the full flavor and try this satisfying and fully raw Cashew Tzatziki Sauce with your raw wrap.  I have a recipe for tabouli included below because c'mon, what is falafel without the tzatziki and tabouli?

Falafel is not only delicious and a great ethnic addition to your culinary repertoire but adding chickpeas to your diet is a great way to add protein and iron!  Since iron absorption is increased when consumed with Vitamin C, this iron rich dish is classically paired with lots of lemon juice for optimal yum factor.  Chickpeas are rich in fiber and when they are sprouted, chickpeas are a wonderful source of natural and vivacious enzymes which will help rev those cellular catalytic functions keeping you full of beauty and energy!  If you want to learn more about sprouting, check out my Sprouting 101!

~ These raw balls need 5-7 hours to dehydrate and the chickpeas take about 2 days to sprout meaning this meal takes a little planning but once you've got the hang of it, sprouting and dehydrating times will become second nature :) 


Let's get started:

Raw Falafel Ball Ingredients:
  • 3 cups sprouted chickpeas, rinsed
  • 1 cup onion, chopped
  • 2 cloves garlic, minced
  • 1 cup sunflower seeds, ground to flour
  • 1/2 cup flax seed, ground to flour
  • 1/4 cup curly parsley, chopped
  • 2 TBSP. olive oil
  • 1/4 cup lemon juice, fresh
  • 2 tsp. coriander
  • 3 tsp. cumin
  • 1 Tbsp. Nama Shoyu or Tamari (optional or use a dash of sea salt)
  • a dash of love and patience
Method
  1. To a food processor fitted with the "S-type" blade, add the sunflower seeds and process into a flour and then place sunflower flour in a medium sized bowl and set aside.
  2. To your food processor add the chopped garlic and chickpeas and process until they are mashed.  Remove the chickpea mash and add to the bowl with the sunflower flour.
  3. To your food processor, add the onion and process until very finely chopped.  Add parsley and process again until the parsley is chopped fine as well.  Add to the bowl of chickpea mash.
  4. Add the remaining ingredients to your chickpea mash and mix well.
  5. Roll chickpea mixture into 1" size balls and lay on a dehydrator sheet lined with parchment paper.  Dehydrate for 5 to 7 hours.


Cashew Tzatziki Sauce (Raw, Vegan, Gluten-Free)
  • 1 cup cashews, soaked overnight
  • 1/2 cup filtered water
  • juice of 1 lemon
  • 1 medium cucumber
  • 1 clove garlic
  • 1 tsp. salt
Method:
  1. Peel the cucumber and slice in half lengthways.  Use a spoon to remove the seeds then slice into half moons.
  2. Into a blender, add the cashews, water, lemon juice, garlic, and salt.  Blend until smooth and creamy. 
  3. Add the cucumber and pulse slightly until the cucumber is in small pieces.  This will keep covered in the refrigerator for about 4 days.
Tabouli Ingredients:
  • 2 cups minced parsley
  • 1/2 cup fresh mint leaves, chopped
  • 1/4 cup quinoa, cooked and cooled (option to use sprouted quinoa* to keep it raw)
  • 2 tomatoes, diced
  • 2 cucumbers, diced (peel if your cucumber is not organic)
  • 2 Tbsp. organic olive oil
  • 3 Tbsp. fresh lemon juice
  • 1 tsp. sea salt
* Click here for instructions on how to sprout quinoa and how to cook quinoa.

Tabouli Method:

          Add all ingredients to a large bowl and toss.  Refrigerate for 1 hour to allow flavor to develop. 

To assemble:  *coming soon! How-to wrap a collard green blog!
Add the falafel ball, tabouli, tzatziki, and chopped romaine lettuce to a large collard green and wrap it.  Great for a lunch to go and really great with a side of my Garlic Kale Chips!  Enjoy!
 
After we ate all of the falafel balls, we used to the leftover tzatziki, tabouli and collard to make veggie wraps the next day.  Just as yummy!


Thursday, January 23, 2014

Raw Pear Tart


Life in the Pacific Northwest can be harsh for a California girl. Cold winters, minimalist produce selections, and expensive apples (wait! I can't actually get a Washington apple in Washington? I'm not paying $2 for an imported apple) have dampened the bounty of my heart.  Driving through the country in late Fall, the roads are lined with apple trees just bursting with delicious looking fruit.  Of course, the stores don't carry them.  There is more profit to be had for the powers at be to ship off our beautiful and locally grown fruit and then import sub-par, prematurely picked substitutes.  Fortunately, one of my clients has 10 acres of farmland where she has a veritable orchard of pear trees!  Thanks to my favorite doggy acupuncturist, I've been pretty much assured my fill of local, rich, and juicy pears! 
 
One day after a dropping off a weeks supply of raw, vegan VV meals, I found two large buckets of pears with a little sign that said, "Take all you want!"  Digging through buckets of fruits, searching for the most perfect specimen brought memories of flea markets and fruit vendors in Brisbane where all produce was displayed in boxes on a dirt floor.  Is there anything as satisfying as buying fruit from a dirt floored local market?  Maybe.  Picking fruit ripe from the tree or produce fresh from your kitchen garden scores pretty high on my happiness charts.  With all of these locally sourced gems, what is one to do with the abundance of pears?  Make pie! It breaks my heart to think about baking or cooking fresh fruits.  The sweetness of fruit is a sensory treat in of itself and the confetti of nutrients, antioxidants, and vitamins are just a pretty awesome bonus.  With perfection being in the raw, why bother to heat these perfect little packages and damages the goods?  In my humble opinion, fruit is best served and enjoyed in the raw.  Therefore, here is my version of the most delicious unbaked pear pie you will ever taste.  Enjoy the process, enjoy the ride, and please be grateful for the privilege that is a perfectly ripe pear on the taste buds.


Let's begin with the crust:
Ingredients
  • 3 cups raw cashews
  • 1 vanilla bean, scraped or 1 tsp. vanilla extract
  • 1/2 cup medjool dates, pitted  (if your dates are dry, soak in water for 30 minutes to an hour)
  • 1/2 cup shredded coconut
  • 1/2 tsp. sea salt
Method:
  1. To a food processor fitted with the "S-type" blade, add the cashews, salt, and vanilla.  Process into a powder. 
  2. Roughly chop the dates and add them to the food processor slowly while it is running.
  3. When the mixture forms a dough that sticks together (test by pinching a piece between two fingers and see if it holds together).  If it sticks together than it is ready, if not, add another date and process again.
  4. Take a pie pan and line with plastic wrap.  Press dough into the pan to form a pie crust.  Cover and refrigerate for 1 to 3 hours.  While it cools, make the filling.
  5. Once the crust is cool, it will be firm enough to remove and still maintain its shape.  Gently remove and discard plastic wrap. 
 
For the filling:
  • 3 ripe pears, cored and sliced thin
  • 1/2 cup medjool dates, pitted, chopped
  • 1 tbsp. coconut oil, melted
  • 1 vanilla bean or 1 tsp. vanilla extract
  • 1 organic orange, seeded and peeled
  •  
Method for filling:
  1. To a blender, add the orange, dates, vanilla, and coconut oil.  Blend well until smooth.
  2. Gently add sliced pears to a large bowl.  Cover with orange sauce and mix until all slices are covered.
Take pie crust and lay the pear slices in facing the same direction.  Wrap around in a circular pattern until all the pears are in the crust.  Take one or two pieces of pear to lay in the center.  Garnish with shredded coconut, optional.
 
 
This pie will keep for a few days covered in the refrigerator.  Enjoy!


Tuesday, January 21, 2014

Sweet Potato Black Bean Chili

 
For as long as I can remember, my mom has been making homemade chili.  She would start by soaking the kidney beans the night before and then she would slow cook the beans with spices and tomatoes in a crock pot ALL day!  As dinner time approached, we'd all crack open the pot of chili whenever we passed the kitchen to steal a quick bite!  Now, if you've ever made homemade beans, then you know the smell is intoxicating.  The aroma of garlic, spices, and cooking beans would fill the house and everyone would have to breathe in the goodness for hours before it was ready to eat.  Cooking beans on the stovetop is my definition of home goodness and comfort food.  Canned beans just do not compare.  However, if you are in a pinch then adding canned beans to a stew or chili will work fine.  If you're going to take the plunge and cook your own beans at home, the extra effort will be more than worth it.  A basic rule of thumb: soak your beans overnight on the counter in a bowl filled with water.  The beans will swell so make sure there is extra water at the top.  In the morning, drain the water (save soaking water to water your plants because it is full of nutrients) and add the beans to a stock pot.  Cover with water so that it comes to about 1-2" over the top of the beans.  Add lots and lots of spice.  A safe option if you are new to home cooking beans is to cook them in vegetable broth.  Or use water and add garlic salt, garlic powder, a bit of fresh black pepper, then you can add some dried red chili's, some herbs liked dried cilantro and a pinch of cayenne pepper, if you like.  Bring the beans to a boil, cover and reduce to simmer.  On average, beans need to cook for 1 -2 hours after having been soaked overnight.  Pinto and kidney beans cook more quickly than black beans so set the timer for an hour then test them.  If they are still firm, keep on cooking.  Once you make your first batch of homemade beans and experience the joy and flavor they bring, you'll never go back to canned beans again!

Now that we've got all these home cooked beans lying around, let's make some chili!!

Ingredients:
  • 1 1/2 Tbsp. olive oil
  • 1 large sweet potato, peeled, cubed (about 1 1/2 cups)
  • 1 cup yellow onion, diced
  • 1 cup green bell pepper, diced
  • 4 cloves garlic, pressed and minced
  • 1 28 oz. can diced tomatoes, undrained
  •  1 1/2 cups cooked blacked beans or 1 15 oz. can black beans, drained
  • 2 Tbsp. Chili powder
  • 3 tsp. ground cumin
  • 1/4 tsp. smoked paprika
  • 1/4 tsp. cayenne pepper
  • 1/4 tsp. sea salt
  • water as needed
  • 4 tsp. lime juice (optional when served)
  • 1/2 cup fresh cilantro (optional when served)


Method:

Heat oil in the bottom of a large stock pot over medium-high heat.  Add the sweet potato and onion once the pan is warm and stir to coat with oil.  Stir often until the onion begins to soften which is about 4 minutes of cooking time.  Add garlic and spices and cook for about 30 seconds stirring constantly.  Add the canned tomatoes with liquid, bell pepper, and beans.  Cover, reduce heat to a gentle simmer and allow to cook for about 5 to 10 minutes.  Add more water if needed.  To serve, scoop chili into a bowl, squeeze a bit of fresh lime juice on top and garnish with freshly chopped cilantro.  The cayenne pepper gives this chili a warming kick so extra hot sauce should not be needed.
Enjoy!


Tuesday, January 7, 2014

Quinoa Sushi, Ginger Pate Sushi, Raw Soy Sauce

 
Right now, I am in the middle of a New Years cleanse that a friend invited me to join.  If you follow this blog regularly, then you know that I usually eat clean on a daily basis.  However, one of my favorite staples, rice, is not allowed on this cleanse.  So, I give to you two cleanse friendly sushi recipes!  We've got a Quinoa Sushi Roll and a Ginger Pate Sushi roll.  Both are incredibly easy to make and top notch deliciousness!  Quinoa actually works very well in sushi because it holds together a lot like rice does.  The main difference is that quinoa allows for a lighter roll and a fresher taste.  It is now my favorite type of sushi by far.

Here is what you're going to need for the Quinoa Sushi Roll:
  • 2 cups quinoa
  • 3 3/4 cups water
  • 1/3 cup vinegar
  • 4-6 sheets of nori
  • 1 avocado, sliced
  • 1-2 Persian cucumbers, julienned
Method:
  1. Place water and quinoa in a pot and bring to boil.  Cover and reduce to simmer.  Cook quinoa for about 15 minutes or until the water is absorbed, the quinoa have little tails and is slightly translucent.
  2. Transfer cooked quinoa to a non-metallic bowl.  Gently stir in the rice vinegar with a non-metallic spoon.  Cover and set aside.
  3. Slice the avocado and julienne the cucumber.  Set on a plate for easy access while making sushi.
  4. If you have a bamboo rolling mat, place the nori sheet shiny side down.  Gently press quinoa onto the sheet leaving about 2 inches of space at the top of the roll.  Lay veggies horizontally along the bottom.  To roll, just take the side closest to you and gently fold the end over the veggies and tuck.  Keep rolling until you are at then end of the roll and a little bit of nori wrapper is exposed.  To seal the roll, wet the end of the nori sheet with water and seal.  If you need a little more help, click here for my picture tutorial. 
*Sushi rolling tip: Wet fingers will keep pieces of quinoa from sticking to your hands and will make for easier rolling.
 
To serve, just slice the roll into 1" pieces and serve with soy sauce or my Raw Soy Sauce.


Ginger Pate Sushi:
 
Ginger Almond Pate:
  • 3 Tbsp. grated fresh ginger
  • 2 cloves of garlic
  • 1 tsp. sea salt (optional)
  • 2 cups raw almonds
  • 2 lemons, juiced
  • 1/2 cup filtered water, use as needed
Sushi Roll:
  • 1 batch ginger almond pate
  • 2-3 romaine leaves, chiffonade
  • 1 medium carrot, julienned
  • 1 red bell pepper, julienned
  • 1 cucumber, julienned
  • 1 soft yellow squash, julienned
  • 4-6 nori sheets
Raw Soy Sauce
  • 1 Portobello mushroom, chopped
  • 1 Tbsp. sea salt
  • 2 cups filtered water
Method for Soy Sauce:
  1. Add mushroom, salt and 1/2 cup water to blender.  Blend on high speed for about 10 seconds then begin to slowly add the rest of the water.  Blend until smooth.
  2. Strain to remove any mushroom pieces before serving.
Method for the pate:
  1. To a food processor fitted with the "S-blade" add the ginger, garlic and salt.  Process into small pieces.
  2. Add the almonds and lemon juice and process until smooth.
  3. With the processor running, add the water as needed for a hummus like consistency.  Put into a small bowl and set aside.
To Roll the Sushi:
  1. Prepare all of your veggies on a plate and set near your rolling space.
  2. Just like the roll above, lay the nori sheet shiny side down and place on top of the bamboo rolling mat if you have one.  Add the pate to the nori sheet in a rectangle at the end closest to you.  On top of that, add your veggies.  Then rock n' roll!
 
Enjoy your homemade vegan sushi!  Filling options are limitless and I encourage everyone to play around with ingredients.  Happy sushi making!

Itadakimasu,
Venturing Vegan
 

How To: Sushi Rolling

Quinoa Sushi and Ginger Pate Sushi
 
Sushi is easy and fun to make and if you want the freshest sushi then you need to learn to make it at home.  My first time  making sushi was when I living in Australia.  My roommates threw a sushi making party (genius idea, by the way!) and I was blown away by how easy it is to make beautiful and delicious sushi!
 
Step 1: Lay out your rolling station.  If you have a bamboo rolling mat, then lay that out.  Otherwise, lay your nori sheet right onto a clean surface.  Without a mat, the sushi will still be delicious but it might be a little looser than what can be rolled with the mat.  Either way, it will be easy to make a lovely sushi platter.  Put your sushi filling within arms reach.

Step 2: Decide if you want little bite-sized sushi or larger rolls.  If you want little bite-sized sushi then prepare as pictured.  Place rice in a rectangle coving half of the nori sheet.  If you want a thicker roll, add rice to the nori sheet leaving only a 2" gap at the top.  Add desired filling to the bottom in a horizontal line.
 
Step 3: Lift the edge of your mat while holding the base your ingredients to keep everything in place.  Roll mat over the top of your nori sheet forming a roll.
 
 
Step 4:  Tuck in along the edge of the roll to make the roll nice and tight.  Keeping your roll tight will keep everything snugly placed inside the roll and will make slicing much easier.  If you don't have a mat, then just tuck in gently with your fingers being careful not to tear the nori sheet.  An option is to lay down a piece of plastic wrap to use instead of a mat if you are struggling to make a tight roll.
 
 
Step 5: Lay the mat back down and take a look at your work.  It should look something like the picture.  To roll again, just lift up the bamboo mat and repeat the process until you have about 1' left of nori sheet at the end.


Step 6: To seal just dab water along the edge of your nori sheet and press the roll into it.  For a good seal, let the roll sit for a few minutes, with seal side down, before slicing.
 
 
This is what the finished roll looks like.  To finish, just slice:

 
For a beautiful platter, add a few slices of lemon, some wasabi paste and pickled ginger with your sliced sushi rolls.

 
Serve alongside my Ginger Salad, Miso Soup, and Sake for a complete Japanese meal. 
 
As you guys know, I am a bit of a venturing vegan!  I love sushi and I love Japan! On my last trip to Japan I was fortunate enough to have an authentic New Years experience.  My best friends grandmother dressed me in a traditional kimono, we traveled to a temple near Ropongi in Tokyo and tossed coins with wishes for the New Year.  This New Year, I encourage everyone to give sushi making a try!  I hope this tutorial helps everyone with their culinary skills this year. 
 
 
Happy Sushi Making!
 
xoxo,
Venturing Vegan


Friday, January 3, 2014

Cranberry Chocolate Ganoche Cake

 
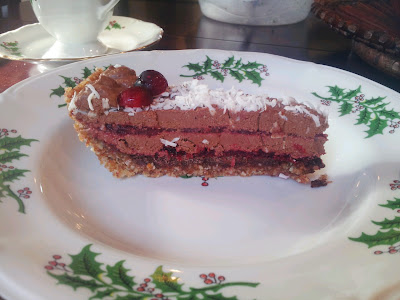
For the past couple of years, I've been slowly perfecting my raw cake making skills.  This year was a magical day in the kitchen when the all new 5 Layer Cranberry Chocolate Ganoche Cake was first created!  My goal was to create something sweet enough to handle the tart kick of raw cranberries.  Then it came to me! Why not add an entire layer of raw chocolate at the base of the cake so that every bite has a rich creamy chocolate chunk to accent the tart cranberry coulis layers?  It was perfect. Take a look at this:
 
 
We've got a raw graham cracker crust, a layer of rich chocolate, cranberry coulis, chocolate cake, cranberry coulis, chocolate cake, topped with chocolate frosting, shredded coconut and fresh cranberries.  It was heavenly! I've learned that the trick to making a great raw cake with layers is to allow each layer to firm up in the freezer before adding the next.  If you don't wait, the layers will sort of mush together and the lines will look curvy and sloppy.  With that in mind, the cake takes a few hours to make.  If you're running low on time.  Cut out a few layers and just do chocolate, coulis, then cake.


Here's what you're going to need:
 
Basic Pie Crust:
  • 1 3/4 cup raw walnuts or almonds
  • 1/2 cup cacao powder
  • 1/8 tsp. salt
  • 3/4 tsp. vanilla extract
  • 1 cup dates, pitted, chopped
Chocolate Cake Ingredients:
  • 1 cup cashews, soaked 8 hours, rinsed
  • meat of 1 coconut
  • 6 dates
  • 1/3 cup maple syrup
  • 1/4 cup coconut water
  • 2 Tbsp. vanilla extract
  • 1/2 cup coconut oil, melted
  • 3/4 cup raw cacao powder
Cranberry Coulis: You need to make 2 batches of this. One batch for each layer.
  • 1 cup fresh cranberries
  • 1/4 cup maple syrup
  • good pinch of cinnamon
Chocolate Fudge Layer:
  • 6 Tbsp. coconut oil, melted
  • 3 Tbsp. maple syrup
  • 3 Tbsp. raw cacao
  • pinch of salt
  • 1/2 tsp. vanilla
Pie Crust Method:
Add nuts to a food processor fitted with the "S type" blade.  Process until the nuts are in very small pieces but not so fine that it's powder. Add in the chopped dates, cacao powder, salt, and vanilla.  Process until everything is mixed together.  Since the dough is sticky, you might get a big dough ball in the processor.  This is a good sign since we want the sticky dates to be the glue that holds the crust together.  To test, pinch a piece of dough between two fingers.  If it holds together well, you are good to go.  If not, add an additional chopped date or two.
 
Take a pie pan and line with plastic wrap.  This will allow for easy removal of the finished cake.  Press the crust into the pan until you have a full crust.  Cover and place in freezer.
 
Chocolate Fudge Layer Method:
To melt the coconut oil, place 6 Tbsp. of oil into a small glass jar.  Place jar in a sauce pan with about 2 inches of water in it.  Place on stovetop over medium-high heat until oil is liquid.  Add all ingredients to a small bowl and mix until smooth.  Pour onto the base of the pie crust.  Cover and place back in freezer.
 
Chocolate Cake Method:
Add nuts to a food processor and process until smooth.  Add remaining ingredients and process until really creamy and smooth, about 2-3 minutes.  Take 1/4 cup of cake mix and reserve for use as frosting the cake. Take half of the batter and place in a bowl for later.  Take the other half and pour into your pie crust over the chocolate layer (once the chocolate layer has firmed up).  Cover and place back in freezer.
 
Coulis method:
Using either a high powered blender or a food processor, add all ingredients and process until a smooth syrup is achieved.  A few small pieces of cranberry are okay.  Add a layer of coulis on top of the first layer of chocolate cake (once the cake layer has hardened up).  Cover and place back in freezer.
 
Repeat for additional cake and coulis layers.
 
Use a piping bag and your 1/4 cup reserved cake mix to decorate the cake.  Add sliced cranberries and shredded coconut for topping if desired.  Remove from freezer and place on counter 30 - 40 minutes before serving. Enjoy!!


Happy Holidays everyone! May everyone have a joyous and yummy vegan-food-filled New Year!

xoxo,
Venturing Vegan