Thursday, August 29, 2013

Pecan-Crusted Tofu with Turnip Mash

Happy Thursday everyone! I know that summer is still lingering in most regions of the US but here in Washington, we a have a late summer downpour! Granted the little island I live on is in the same growing zone as Hawaii and we are classified as a temperate rainforest.  The rain may be pouring down in buckets (yay! it's great for my garden) but it's warm and steamy and the fogs are croaking just outside my window.  They are so cute I just have to share a quick picture I snapped of these adorable little green tree frogs that are absolutely everywhere on the island!  I guess that's why we have island icons like Frog Rock and dozens of fiber glass frogs painted by local artists on various spots throughout the island.  Well, I didn't paint a frog but I did snap this little guy on the blackberry bush:


Enough about little frogs.  Today's weather has me in the mood for something fresh but still warm so I am making one of my absolute favorite Venturing Vegan recipes: Pecan-Crusted Tofu.  As an avid non-GMO promoter, please make sure your tofu is organic and to certified non-gmo.  Soybeans are one of the top gmo crops so make sure the label is there, organic tofu runs about $1 more than non organic so it's an easy swap.  Almost all stores carry an organic version of tofu so it should be super easy to find.

This dish is a healthy version of comfort food without any sacrifice in flavor!  The tofu really takes center stage here and all of my newly vegan and transitioning clients love this dish!  The tofu has a wonderful texture and the meal feels very complete served with garlic green beans, steamed carrots and turnip mash (you could also serve with mashed potatoes).

Serve this dish anytime of year and plate with whatever local, seasonal produce you have on hand such as roasted squash in fall or wilted greens in winter.

Pecan-Crusted Tofu Ingredients:
1 package organic firm or extra firm tofu
1/4 cup melted vegan butter
1/2 cup honey mustard
1 cup panko (Japanese bread crumbs)
1/2 cup pecans or walnuts, chopped
1/2 cup chives, finely chopped
1 tsp. black pepper
1/2 tsp. sea salt
Lemon wedges to serve

Turnip Mash Ingredients:
2 lbs. turnips
1/2 cup non-flavored vegan milk such as hemp or almond
3 Tbsp. vegan butter
salt and pepper to taste

Method:
Drain water from tofu and press excess water out by wrapping tofu in a kitchen towel or paper towel and putting something heavy on top.  I usually use a stock pot with potatoes inside.  This will press the tofu very well.  Pressing tofu allows for a meatier texture once cooked and allows the tofu to absorb all the flavor you add to it.  Press for 10 to 15 minutes.

Preheat oven to 400°F and grease a shallow baking dish.  In a small bowl, add the vegan butter and honey mustard.  Whisk until well incorporated.  In another small bowl, add the chopped walnuts, chives, panko, salt and pepper.  Mix.

Take your pressed tofu and cut into 4 slices about 3/4" in thickness.  Take each slice and dip in the butter mixture making sure to coat it well.  Then dip it into the panko mixture and press the panko mix into the tofu so that it sticks. Some will crumble off but don't worry about that because most should stick.  If not, you haven't added enough of the butter mixture.  Place each piece of tofu on the baking dish.  Repeat until all pieces of tofu are coated. Place dish in the oven and bake for 12-15 minutes on the middle rack.  Half way through cook time, carefully flip each piece of tofu.

In the meantime, peel and cube the turnips.  Put them in a pot, cover with cold water and bring to boil. Add a pinch of salt and cook for about 10 minutes or until turnips are tender.  Drain turnips and return them to the pot over low heat.  Mash turnips to your desired consistency (I like to leave a few chunks in mine).  Add vegan butter and vegan milk and gently stir in to the turnip mash.  Cover and leave on low heat until ready to serve.  Serve hot.

Remove tofu from oven and let cool for about 2 minutes before plating.  Serve with turnip mash, additional veggies or side salad and lemon wedge.  Enjoy!
 
Thank you for stopping by the Venturing Vegan blog today and taking time out of your day to read a recipe or two.  Please remember to always buy your tofu responsibly and buy organic. We don't want no gmo in our tofu!  To learn more about genetically modified soybean you can check out this website Nation of Change or you can watch the documentary Genetic Roulette.  If GMO makes you as mad as it makes me, join the movement by getting involved in your local non-gmo
groups, always buy corn/wheat/soy/canola oil organic and do what we did at the turn of century, grow your own!  Freedom gardens go a long way in the movement to fight Monsanto, global warming, and soil destruction.  If you have any questions or comments, please feel free to leave them below or shoot me an email at iamventuringvegan@gmail.com


Wednesday, August 28, 2013

Raw German Chocolate Cake

Coconuts are divine, delicious, and decidedly good for us!  Their creamy and meaty texture is perfect for making raw desserts!  Using the meat, coconut milk, coconut water, coconut butter, or coconut oil we can create tempting and sinful raw vegan eats that are good for the taste and good for the body.

When I was living in LA, I had a slice of raw vegan cheesecake at the amazing CafĂ© Gratitude.  Love at first bite does not even begin to describe the sensation of biting into my first raw cake. Since then, I have made many cakes but this one is extra special!  I decided to start experimenting and playing around with my cake recipes and to my delicious surprise, coconut butter works as a wonderful substitute for coconut oil. It also results in a creamier cake.  When possible, I also cut the amount of cashews in half and use 1 cup soaked cashew and 1 cup fresh coconut meat to reduce the amount of nuts in my cakes.  Once I made the swap, I instantly fell in love with the results and created my first extra special childhood dream cake: Raw German Chocolate Cake.  The flavors in this cake are identical to the baked not-so-healthy not-so-vegan version and it is just heavenly.  Plus, it's very pretty as well.  I hope this recipes encourages you to start playing around with your own cake creations because the combinations of flavors, nuts, butter, and fruits are endless! 


This recipe calls for coconut butter which can be very expensive (about $8 a jar) and is not always organic.  Making fresh coconut butter at home takes about 10 minutes!  It will also save you loads of money and gives you the option to make it organic.  To make coconut butter, simply take dried shredded coconut and put it in a food processor fitted with the "S blade."  Process for about 10 minutes, stopping periodically to scrape down the sides.  I've found it works best to blend a minimum of two cups of shredded coconut at a time. 

My Raw German Chocolate Cake recipe also calls for fresh coconut meat which means you've got to roll up your sleeves and crack open one of these tropical gems.  If you don't know how, don't worry!  I've made a how to on the best way to open a coconut.  It's really easy so don't fret :).

One more word before we dive into the recipe.  This cake has layers and to create beautiful and even layers, it is best to freeze each layer for about 30 minutes to an hour before adding the next layer.  If you are short on time, I suggest doing a vanilla layer, then chocolate layer and then adding the coconut topping.  This cuts prep time and doesn't compromise flavor.  Okay, here we go...

Chocolate Coconut Crust:
1 cup raw walnuts
1/4 cup raw cacao powder
1/2 cup shredded dried coconut
1/2 dates (soak for an hour if they are dry), pitted, chopped
1/4 cup raw honey or raw coconut nectar
pinch of salt (optional)

Crust Method:
Add all ingredients to a food processor fitted with the "S blade" and process until your mixture is crumbly and sticks together when you press it between your fingers. 
Take a pie pan and line it with plastic wrap.  Press your crust mixture into the pan in that shape of a crust.  It will work just like play dough, holding its shape and forming easily.  The dates work as a binding agent and making the crust should be very easy.  If it's not sticking together, put it back in the processor and process a bit longer.

Vanilla Layer:
1 cup soaked raw cashews (soak overnight at room temp then drain and rise before use)
3/4 cup coconut butter
1 to 1 1/2 cups fresh coconut meat
1/2 cup coconut water (or coconut milk or even almond milk, whichever you have)
3/4 cup raw honey or coconut nectar
2 Tbsp. vanilla or 1 1/2 vanilla bean (scraped)

Vanilla Layer Method:
Add all ingredients to a food processor fitted with the "S blade" and process until your mixture is smooth, creamy, and lump free. 
Add 1/2 of the vanilla mixture to your pie crust.  Reserve the other half.  Cover your pie pan with plastic wrap (or use another identical pie pan which is what I do).  Place cake on a flat surface in the freezer for about an hour.
Chocolate Fudge Layer:
1 cup coconut butter
1/3 cup coconut oil, melted
1/4 cup raw honey or coconut nectar
2/3 cup raw cacao powder
1/2 vanilla bean or 1 tsp. vanilla extract
4 Tbsp. soaking water from dates (use water from the dates for caramel coconut layer)
Chocolate Fudge Layer Method:
Add all ingredients to the food processor and blend until smooth and creamy.  Just like we did with the vanilla layer, add one half of your chocolate mixture on top of the vanilla layer.  Reserve the other half for later.  The chocolate layer will harden much quicker than the vanilla (from the coconut oil) so freeze for about 20 to 30 minutes.  Then remove from the freezer and you will have this:
 

Now, repeat the layers.  Add one more vanilla and one more chocolate.  As I mentioned above, if this is too time consuming, just add all the vanilla layer at once and then all the chocolate on top of that.  However, making the layers really gives your cake a stunning look.  It is up to you and your schedule.  It will taste delicious either way :). Now for the topping...

Caramel Coconut Layer:
1 cup dates, soaked two hours (reserve soaking water for chocolate fudge layer) pitted, chopped
2 Tbsp. coconut oil, melted
1/4 cup honey
1/2 vanilla bean or 1/2 tsp. vanilla extract
1/2 cup shredded dried coconut

Caramel Coconut Method:
Add dates, coconut oil, honey and vanilla to food processor.  Pulse a few times to mix.  Then add the coconut shreds and process until well combined.  Add this topping as the final layer to your cake.

Keep the cake in the freezer for storing.  It should keep for a week but honestly, it has never gone past 3 days uneaten in my house!  When ready to enjoy, remove from freezer and lift out using the plastic wrap to lift the cake up and out of the pan.  Discard plastic wrap and let sit at room temperature for 15 minutes before cutting and consuming.  Enjoy and congratulations on your beautiful Raw German Chocolate Cake creation!

If you love this recipe, please share with your friends and family!! I blog because I love to inspire other people to live healthy lives without sacrificing in flavor, enjoyment or fun!  I believe vegan recipes should be like a good piece of cake, savored and shared with the ones you love.  Please share, spread the joy, and enjoy!  You can also find Venturing Vegan on Facebook for more inspiration or on Instagram for daily vegan living!  Thanks for stopping by!

Tuesday, August 27, 2013

How to Make Coconut Butter

Coconut butter is delicious, creamy, and a perfect ingredient for raw desserts!  At the store, a jar of coconut butter will cost anywhere form $8-15 and it's not always organic.  Instead, try buying organic shredded coconut from the bulk bins and make your own!

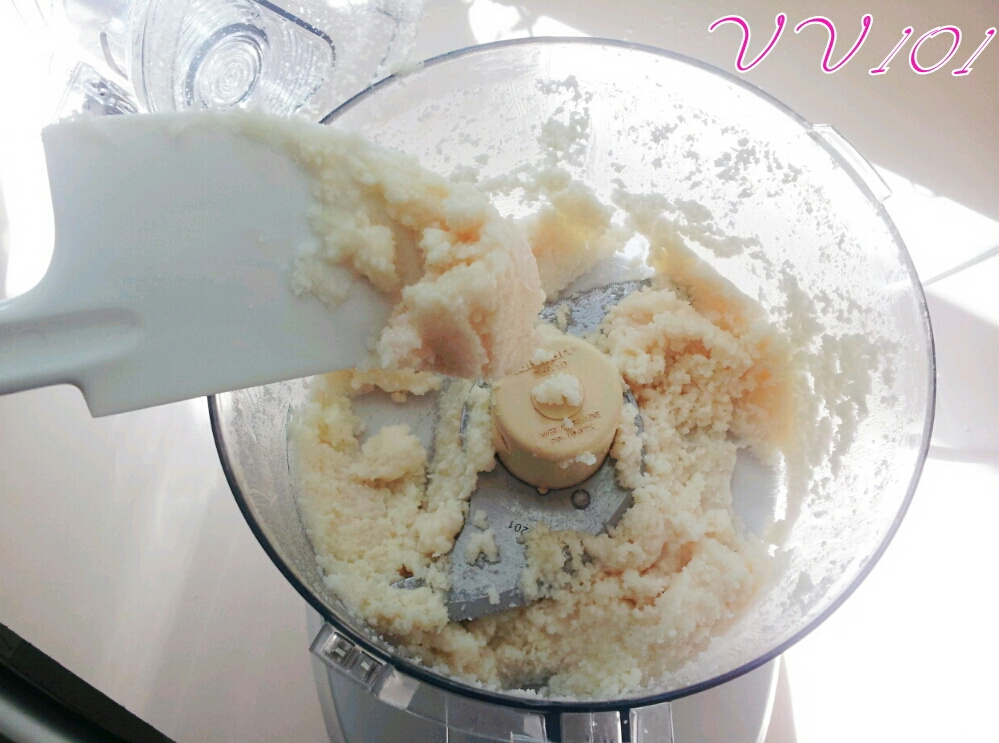
Just take a minimum of 2 cups dry shredded coconut and add it your food processor fitted with the "S blade.".  Adding less than two cups causes the coconut to just stick to the edges and bottom without incorporating. Stick to 2 or more cups at a time for the best results.
 
Process for 10 to 15 minutes stopping occasionally to scrape down the sides.  After awhile, you will get coconut butter.  Process longer for a thinner butter and for a thicker butter, process for less time. 

Here is my coconut butter after 10 minutes.  I processed for an additional 5 minutes then put the coconut butter in a mason jar.  It will keep in the refrigerator for about a week.  Try making your own and see how easy and fun it is!

How to Open a Coconut


Vegans love coconuts! We love them so much that we have mastered the art of opening a coconut and take great pride every time we crack one open.  Not only are we opening a delicious treat, we are tapping into an ancient form of medicine and disease prevention.
 
The palm tree (which is what grows our coconuts) is know to the Pacific Islands as the "Tree of Life" and they believe the coconut is the cure for all illness.  Antiviral, antibacterial, antifungal and anti-parasitic, coconuts provide a nutritional powerhouse for the human immune system.  In all its forms, either as milk, raw meat, oil, butter, or coconut water, the coconut is an excellent source of fiber, vitamins and minerals.  It's loaded with calcium, potassium, magnesium and electrolytes.  Coconut water actually has the same electrolyte levels as human plasma and has been used in emergencies and wars as an IV drip and for plasma transfusions! Having a delicious flavor is just an added bonus!
 
To tap into this rich resource, one needs to master the art of opening a coconut.  Dropping on the floor, throwing is against the door, and tapping three times won't open these bad boys.  Using a sharp knife and some know how is the surefire trick every time!  This How To is for a Young Thai Coconut which is the type of coconut with the most water inside.  Mature coconut have brown outside with lots of hair and will have little to no water inside but usually offer up a thicker layer of meat.  Young coconuts are they variety available at most stores.

Step 1: Lay your coconut in its side and use one hand to grip the base of your coconut.  With the other hand, use a sharp chefs knife to remove the top layer of coconut skin.  This will expose the hard "crown" that we will be cracking and makes the process a bit easier and cleaner.


Step 2: Once the top of your coconut is trimmed up, turn it back onto its base.
 
 
Step 3: Using the base tip of a butches knife, gently tap around the rim of your coconut.  Every coconut has a membrane around the base of its "crown" and this is soft circumference that will crack easily when tapped.  Tap around and when your knife goes into the coconut easily, then you've found the membrane! Tap along this line for half the length of the crown.


Step 4: Slip your knife into the open line that you've just made.  Then using your knife, push the lid of your coconut up and open.


Congratulations! You've just opened your coconut in 4 simple steps!  Enjoy!

Saturday, August 24, 2013

Thai Fresh Rolls


Fresh rolls are a vegans best friend.  They are easy to make, filling, a breeze to take on the go, and incredibly versatile! They never get boring!  If you are looking for something that is fresh but still filling try taking a break from your normal salad and try a Thai Fresh Roll instead.  For this recipe, I've used lots of colorful produce to infuse the flavors of summer and my garden.  We've got beets (root and tops), zucchini, cilantro, carrots,  and crisp romaine.  The veggies give the roll freshness and crunch and the rice noodles give it a little something extra to bite into and enjoy as a textural contrast. You could always add tofu, tempeh or chickenless strips for a more meaty texture. I love these rolls and will keep posting my greatest creations!  You can also check out my Sprouted Mung Bean Wrap post, too!
 
Once you've done your first wrap, it gets easier and easier to make these and you'll find that a plateful of fresh rolls can be made in about a half hour from prep to plate. A basic julienne for your root veggies, a chiffonade for the lettuces, and a quick chop for the herbs.  If you don't like cilantro or don't have any on hand, then try using basil or mint.  Both go well with my  Spicy Peanut Dressing and  both offer a bold flavor punch with each bite.

Here we go:


Ingredients:
1 red beet, julienned
1 bunch beet tops, chiffonade
5 romaine leaves, chiffonade
2 carrots, julienned
1 cucumber, julienned (if it's organic, go ahead and leave the skin on)
1 zucchini, julienned
1/3 cup cilantro, chopped (if they are from your garden go ahead and add the flowers)
8 rice wrappers
About 1/3 package rice noodles

* to chiffonade, take your leaves and stack them so they face the same direction.  Roll them like a cigar, then slice them horizontally to the stem to create ribbons/shreds.

Method:
1. Prepare your filling by washing and prepping your produce as pictured.  The rice wrapper will need to be filled quickly once you have softened it so it's  important to have your filling prepared and easy to reach.
2. Cook your rice noodles according to the package.  This usually requires you to cover your noodles in boiling water and allowing them to soften anywhere from 5 to 20 minutes.  It depends on the type of noodles you have on hand and will vary since this recipe works with a variety of rice noodles.  You could even used cooked soba or ramen noodles if you like, just as long as they are cooled. Mung bean noodles are also awesome for recipe, too!
3.  Prepare a dish/plate that is large enough for the rice wrapper to be placed on and is deep enough to hold a bit of water.  Place warm water in the dish. (I like to keep a bowl of hot water nearby to add to the plate to keep the temperature of the water warm.  It cools quickly).  Take a rice wrapper and submerge it in the dish.  Make sure it is completely under the water and that is evenly covered so the wrap softens evenly.  Leave until it has softened completely.  This will take about 40 to 60 seconds.
4.  Gently remove softened rice wrapper and allow excess water to drip off.  Quickly place on a flat surface (such as a cutting board).  Make sure to lay your wrapper flat because any folds will stick together and cause tearing.
5.  To the middle of the wrapper, add your filling.  Just like a burrito. Then fold over two sides, at the top and bottom of your filling.  We want to roll vertically along the same line as the julienned vegetables.  Then take one side and roll over your filling , tucking the wrapper under the filling then continuing to roll.  See picture.
6. Repeat for all 8 wraps.  Depending on how full the wraps are, you might not use all 8 wraps. That's okay.  Just have fun with it and use what you have.  One word of advice, wraps that are too full will break and tear easily so keep them about the size of a big egg roll.
Serve with my Spicy Peanut Dipping sauce or with a sweet chili sauce.  Remember, you can put any combination of filling in these guys so play around and have fun!
I've plated mine with fried rice for a complete dinner.  Enjoy!
Thank you for stopping by the Venturing Vegan blog!  If you enjoyed this blog or know someone who might, please feel free to share.  All recipes are free and made with love and the hope that a peaceful, plant-based planet is in our future!  Check back for more delicious recipes or follow Venturing Vegan on instagram and facebook for daily doses of plant-based inspiration.  Have a wonderful veggie inspired day!


Friday, August 23, 2013

Quinoa Tortillas and Jalapeno Lime Slaw


Freshly made corn tortillas are a heavenly experience and once you've made fresh tortillas, tasted them hot off the stove, and fallen in love with them,  then you will always notice the difference between store bought and homemade.  As a child growing up in San Diego, Mexican food was abundant.  Living so close to the Mexican border meant a huge selection of authentic Mexican restaurants most of which would make tortillas from scratch on a stone mortar and hot plate out under the California sun.  These tortillas were so heavenly delicious that eating them plain or with a dab of vegan butter was enough since the sweet corn was fragrant on its own.  Today, I still love these tortillas but I also appreciate taking a step back from corn and wheat to try something new. 

Quinoa is a perfect substitute for making tortillas at home.  Since quinoa has a strong nutty flavor that lacks the sweet flavor of corn, I've also added in coconut flour for a complementary and mild hint of sweetness.  Like many gluten free breads and foods, these tortillas can be delicate and it is vitally important not to overcook them.  With practice, these babies turn out beautifully time after time.

In gardening news, yesterday I harvested my first ever homegrown cabbage!  I'm so proud and couldn't wait to make something with the first of many cabbages to come!


Since I wanted to incorporate raw cabbage, black bean tacos came to mind,  I decided to make fresh tortillas and the inspiration for my open face black bean tacos was born.  Just made tortillas have a weight and moisture to them that cannot be found in store bought tortillas.  Because of this, I decided to use my tortillas as the foundation of the dish and take the cabbage from inside the tacos to the outside and dress it up a bit.  This Mexican style cabbage slaw works well as a side dish for a variety of meals and can also be enjoyed alone since it is very lightly dressed like a salad.  For a denser variety, opt for using my Creamy Mayo instead of the flax oil and honey. 

Since slaw needs to sit and soak up the juices, it is best to make this first and allow it to sit for 20 minutes or make ahead and refrigerate overnight. If you've got a garden going or are interested in starting one we've got cabbage, cilantro and chives from the VV kitchen garden!  All incredibly easy to grow.  Cilantro and Chives are perfect choices for an apartment window or balcony since they grown well in containers.  You can actually buy store bought chives and put the root end in water and place in a sunny location and the chives will grow! (In case you're wondering, I've saved the large outer leaves for my Raw Sauerkraut recipe which I'll post soon!).


Jalapeno Lime Slaw
- 1 small head of cabbage or 1/2 a large head of cabbage, red or green or a mix of the two, washed, cored, and cut into wedges
- 4 scallions, thinly sliced on diagonal (white and green parts)
- 1/4 cup cilantro, chopped
- 1 jalapeno, seeded and minced (optional: leave some seeds in if you like it hot!)
- 1/4 cup lime juice, freshly squeezed
- 1 tsp. honey (or raw coconut nectar)
- 1 tsp. flax oil
- salt to taste (optional)
* If opting for a more traditional variety, swap the honey and flax oil for 1/4 cup plus 2 Tablespoons of my Creamy Mayo.

Method
1. Thinly slice cabbage using a knife.  Using a knife instead of a food processor will allow you to control the length and width of your slices.  Place sliced cabbage in a medium sized bowl.
2. Add the cilantro, chives, and jalapeno to the cabbage.
3. In a small bowl, mix lime juice, honey, and flax oil.  Whisk to incorporate and then pour over slaw.  Toss to coat and set aside.  You can make this in advance and allow to refrigerate overnight for added flavor.

Quinoa Tortillas
- 1/4 cup chia meal (chia seed ground up in a coffee grinder)
- 2 Tbsp. melted coconut oil
- 6 Tbsp. warm-hot water
- 1/4 cup quinoa
- 1/8 cup sunflower flour (or almond or pumpkin seed flower are also good options. Use coffee grinder to make flour).
- 1/8 cup coconut flour
- 1/2 tsp. baking powder
- 1/4 cup tapioca flour
- a pinch of salt

Method
1. In a small sauce pan, dry toast the quinoa for about 30 seconds.  This will remove the saponin coating and bitter flavor from the quinoa.  Remove from heat and allow to cool.
2. In a coffee grinder, grind toasted quinoa into flour.
3. In a medium bowl, combine chia meal and coconut oil. Mix well.
4. Add quinoa flour, seed/nut flour, coconut flour, baking powder, tapioca flour, and salt.
5. Begin to mix ingredients while adding the warm-hot water one tablespoon at a time until you have a pliable and thoroughly mixed dough.
6. Divide dough into 4 evenly sized balls.  Place a piece of wax paper on counter top.  Add one dough ball on top of the wax paper.  Cover with another piece of wax paper and gently push down to flatten.  Then use a rolling pin to roll tortilla to desired thickness and width (about 8"). Repeat for all  tortillas.
7. In a medium sized skillet (stainless steel) add a little bit of coconut oil and bring to medium or medium-low heat.  Once the oil is melted, your pan is ready for the tortillas.
8. Add a tortilla to preheated pan.  Cook for one minute and flip.  Cook additional 30 seconds.  Do not overcook as it will cause tortillas to break upon folding.  Repeat for all 4 tortillas.

Assembly:
Lay Quinoa Tortilla on plate and add to it cooked quinoa (I've added a dash of Mexican seasoning and lime juice to my cooked quinoa for additional flavor), black beans, red onion, avocado, cilantro, and optional Daiya cheddar shreds.  Add a healthy serving of the Jalapeno Lime Slaw and serve with hot sauce.  Happy Gluten Free and Non GMO eats!


Thank you for stopping by the Venturing Vegan blog! I love to share recipes and to hear feedback! If you love this recipe or if you hate this recipe, please let me know!  Feedback is blogger fuel.  As always, if you dig these vegan eats, please share the recipe with your friends and family! Vegan recipes should be like a warm summer breeze, always free and best when shared!


Tuesday, August 13, 2013

Chocolate Coconut Chia Pudding

Tiny little packets of dense nutrients and low calories, chia seeds are truly a superfood. However, the beauty of the chia is that, unlike some other superfoods like goji berries or maca, they are extremely inexpensive and easy to find at most stores.  If you are a sprouter like me, than you've got a stockpile of seeds in your pantry.  I've got alfalfa, broccoli, mung beans, adzuki beans, garbanzo, etc.  I've also got chia.  Sprouting chia seeds in a royal pain in the behind because when wet, these super seeds form a layer of gel around the outside.  This gel makes the seeds clump together and this is not so sprout friendly.  While the gel makes for miserable sprouting, it makes for a simply divine pudding!
If you love boba tea or tapioca pudding then you will love love love chia pudding.  Personally, the flavor of tapioca can be a bit strong and it is not my favorite but the similarity here lies in the texture created by this outer layer of gel.  When turned in to pudding, the chia seeds create a thick texture with bounce, just like pudding! A coconutty, chocolaty, creamy delicious pudding! 
Chia pudding is my go to snack anytime and all the time.  It's a wonderfully sinful treat that, unlike my Rawlicious Chocolate Pudding, is extremely low in fat and calories.  It's a low calorie, nutritional powerhouse and this is exactly what I'm looking for in a snack or dessert during those skinny summer months.
This pudding has a rich satisfying flavor from the raw cacao and coconut nectar (or honey) plus the little bits of coconut add an extra flavor layer to each bite.  Try this simple pudding recipe with any flavors or fruits that you like.  The chia seed is extremely versatile and can be played up any way you want.  This is my first chia pudding post but check back soon for more as I will be playing with lots of flavors and posting the best results!

Here are the ingredients:
1 cup almond or coconut milk
1 tsp. raw cacao powder
1 tsp. raw honey or raw coconut nectar (you could also use liquid stevia if you prefer)
1 Tbsp. shredded coconut
2 Tbsp. chia seeds

You can use a bowl or a mason jar but I prefer the jar method since I always take my chia pudding on the go for a quick snack or even a meal.

Method:
Add all ingredients to the jar and place the lid on tightly.  Then shake, shake, shake until all the ingredients are well blended.  Place your pudding in the refrigerator for 5 hours or overnight. The longer it sits the more pudding like it will become.  It's that simple! Garnish with berries and mint and enjoy!


Thursday, August 8, 2013

Hawaiian Quinoa Salad


Summer always reminds me of traveling to one of my favorite destinations in the world, Hawaii.  Drenched in sunshine and the sweet scent of plumeria, my mother and I visited pineapple farms, ate pineapple ice cream, indulged in chocolate covered macadamia nuts and soaked up the flavors of the island.  This Hawaiian Quinoa Salad combines all of my favorite and most cherished flavors of summer, salt air and Hawaiian pineapple farms.  I've added mango to the mix because the rich flavors and delicate texture of the mango fruit always make me think of sunshine.  Just another way to summer up this awesome salad.

Having a fully stocked Asian pantry makes it easy to create delicious marinades and dressings like the one I've used for this salad.  This week, I've loaded up on all of my must have Asian cooking staples like mirin, rice vinegar, sesame oil, tamari, nori sheets, green noodles, sushi rice, green tea and coconut milk. For the perishables, I've got green onion, miso paste, coconuts, pineapple, bell peppers, and organic sprouted tofu.  That big brown fruit behind the red bell pepper is Hawaiian taro root for a Taro Root Cheesecake that I'll be making later this week.

 
Since I was stocking up goodies today, I grabbed some of these summertime beauties as well.


Ok, time to get cooking!  This Hawaiian Quinoa Salad brings together all of the bright colors and flavors of summer into one nutritious salad that everyone will love!  Here we go!

Makes 8-10 Servings
Ingredients:

1/2 medium white or yellow onion, diced small
2 cloves garlic, minced
2 teaspoons toasted sesame oil
2 1/4  cup quinoa
3 cups vegetable broth
1 cup light coconut milk
1 1/2 cup red bell pepper, diced
1 to 2 mango, diced (or 1 1/2 cup fresh pineapple, diced)
1 cup toasted macadamia nuts, coarsely chopped
6 green onions, sliced

Dressing ingredients

1 1/2 Tablespoons white mellow miso
1 1/2 Tablespoons low sodium tamari or soy sauce
3 Tablespoons pineapple juice
1 1/2 teaspoons mirin
1 1/2 teaspoons seasoned rice vinegar
1 1/2 Tablespoons toasted sesame oil

Directions:
1. In a medium sized saucepan, add the onion, garlic, and sesame oil.  Saute on medium heat for about 5 minutes or until the onions are softened.
2.  Add the dry quinoa and stir until toasted.  (This will make for a fluffy quinoa). 
3.  Add organic vegetable broth and coconut milk.  Bring to boil, reduce to simmer and cover.  Cook until all of the liquid is absorbed (about 20 minutes) and the quinoa is fluffy.  Give the quinoa a stir to make sure all the liquid is absorbed.  If not, allow to cook for a few additional minutes.  Once the quinoa is cooked, remove from heat and allow it to cool.
4.  While your quinoa is cooling, dice your bell pepper and mango.  To dice mango: Slice the fruit in half around the core.  Take each half and cut a criss-cross pattern.  Then push up on the center of the skin side of each slice to push up the criss-crossed pieces.  Then cut off each piece for easy, diced mango.


5.  Chop the macadamia nuts and slice the green onions.
6.  Combine all dressing ingredients in a small bowl and stir.
7.  Add chopped bell pepper, mango, macadamia and green onions to cooled quinoa.  Gently fold ingredients into quinoa.  Pour dressing over salad and gently stir. Let chill in the refrigerator for an hour and up to overnight. 

We had a bbq today to enjoy the beautiful ocean view and served up Black Bean Veggie Burgers with Veggie Kabobs to accompany the Hawaiian Quinoa Salad.


After our Hawaiian feast, we took a walk down to the pier to enjoy this beautiful sunset

Thank you for stopping by the Venturing Vegan blog!  All views are greatly appreciated and please share any and all recipes with friends and family!  Recipes should be like the summer sun, enjoyed by all and always free!  If you tried this recipe and loved it, please comment below and let me know your thoughts. Enjoy and have a wonderful summer!